Showing posts with label Asparagus. Show all posts

Wednesday, 20 April 2022

Burgundine Asparagus arrives

My Burgundine Asparagus crowns dispatched by Suttons on Good Friday finally arrived today. Second clear covid test, and I'm feeling so much better, that a dash to the allotment to get them in the ground late this afternoon / evening was in order.


First I needed to remove the glass panels off the square flower buckets and then remove the buckets from the path and the trench. The buckets have been holding up the sides of the trench.


The square flower buckets were stacked on the patio in front of the plot 1 shed and covered up with the glass panels to stop the contents getting wet again. The first early spuds are going in these as soon as possible.


Trench after the square flower buckets were removed.


Sieved earth used to make the mound and then the Burgundine" Asparagus crowns placed 200 & 400mm from the ends, then at equal spacing so the two rows are staggered. The paving blocks were used to measure the offsets from the ends of the row. 


Crowns carefully opened out like spiders sitting on the mound.


Sieved earth emptied on top of the mound.


Closer view of the sieved earth over the Burgundine Asparagus crowns. Watered in before the Equigrow Fertile Mulch was added.


First sack of Equigrow Fertile Mulch added to the trench.


Yep there are some Marestail showing in the gap between the two trenches, they need to be dug out next visit.


Equigrow Fertile much spread over and watered in.


Basil Brush Fox Proofing added after final watering.


Comfrey Bed coming alive and will soon dwarf the bluebells 

Monday, 11 April 2022

More Sieving Soil


I was hoping to receive an email from Suttons today informing me they have dispatched my "Burgundine" Asparagus crowns, especially as they have been on order since November last year, and then they told me they would be dispatched in 2023, before finding out that was an error, and then having different dispatch times from order on the web site until on Friday it's dispatch within 48 hours!


The email I received on Friday said I should have them by the end of this week. No notification of dispatch has been received today.

So in readiness for the blessed arrival, I spent 3 hours on the allotment this afternoon, sieving the soil to make the mound in the trench, and then cover the crowns was in order.

Three more sacks of sieved weed free soil is ready and added to the two and a half sack I processed on Sunday afternoon, hopefully that's enough.


Sieved soil from the flower buckets, which were filled with the contents of the excavated trenches.


Closer view of the sieved soil, worms and all.


First four flower buckets processed, two from the trench and two in the row behind. 

The soil at the bottom of the buckets is still very wet and claggy so I used a claw hand tool to rough and break the mass up, and then faced the buckets to the sun to help dry out the soil. 


First sack of soil, shoveled out of the wheelbarrow and into the empty westland Gro-Sure Farmyard Manure sack ready for using when the crowns arrive. 


Typical contents left over from sieving the soil, added to a big rubber trug. I have no idea what I'm going to do with the material that's too big and the stones at the moment.


Everything covered up again against any rain, the sun went in and the clouds came over and I felt a few spots of rain, then it cleared again and was 5pm and time to make my way home. The two and a half sacks this end of the bed were from Sundays sieving. 


Letting the material in the Flower Buckets dry out and stop any more water getting in and the mesh panels from the old leaf bins keeping Basil Brush and his mates off the bed. 

I need to come up with a permanent solution to keeping Basil and his mates out of the bed. What that final solution is I'm not quite sure yet, I have a few ideas that need bottoming out. 

Picture left, three sacks of soil that were sieved this afternoon. so that's 5.5 sacks to make the triangular mound and to cover the crowns once they are received and planted out.

I did water the Pacific Purple Asparagus in their trench again, it may be a little overkill but after all this work I want to give them a good chance of survival, and I'm informed by those who know that I should hopefully see some asparagus in about a months time, although you don't harvest in the first year, and only take less than 50% in the second year.  

Sunday, 10 April 2022

Sieving & Watering

I read a Facebook posting from another person who also received their asparagus crowns but theirs were supplied in orange netting no plastic like mine.

Their instructions suggested soaking the crowns in water for an hour, so on arriving on the plot I gave the Asparagus a good drenching.

I also watered the onions and cleaning one of the Quadgrows in the Plot 1A Greenhouse.

Two and a half sacks of soil processed through the rotary sieve this afternoon from the buckets of soil in the trench and behind it.

I need to make sure I have everything ready for when the next 5 crowns arrive.

Friday, 8 April 2022

Pacific Purple Asparagus from Suttons


The Pacific Purple Asparagus Crowns from Suttons arrived two days ago and this was my first opportunity to get down to the allotment and plant them. as it's been very wet and windy plus I had no one to look after my wife to allow me to get down to "Avalon" aka Plots 1 & 1A. 

There has been some major confusion with the dispatch date for the five "Burgundine" crowns that were also ordered back in November about when they would be shipped and although it said 21 days 30 odd days ago, on the web site they didn't arrive. I then discovered that other people I know that had ordered 25 Burgundine crowns were informed by customer support that they would not be delivered until next year! 

When chased I was sent an email on the 4th April with a dispatch date of 20th March, and an email informing me that the Pacific Purple dispatch was delayed and they would be shipped on the 5th April. 

On the 7th April I received an email from Customer Support apologising for the misinformation re not being available until next year.

We are getting in touch to apologise for an email you were sent in error, relating to your Asparagus Crowns.


It appears we got something wrong and advised your order was going to be delayed until 2023. We would like to assure you this is not the case, and we are expecting your order to be with you by the end of next week.


We are looking into how this error has occurred and we are very sorry for any disappointment and inconvenience this matter may have caused.

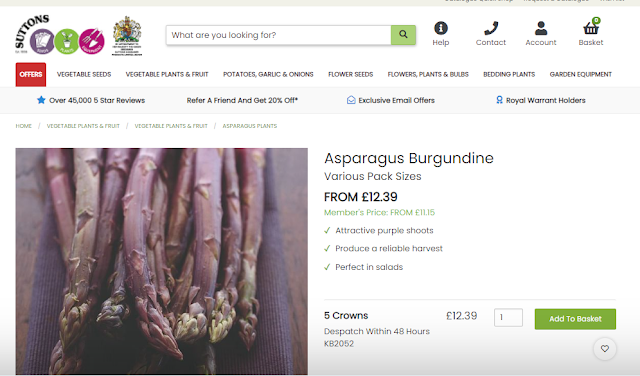
This is the web site today 


So with Dispatch down from 3 days to 48 Hours I'm hoping the crowns will be with me well before the end of next week, my problem is going to be getting them down to the allotment and into the ground as quickly as possible once received. 


Back to planting the Pacific Purple Asparagus from Suttons. I uncovered the trench to expose the farm year manure in the bottom. Some of the side to the trench had collapsed in a little due to the rain and wind over the last couple of days since I excavated and laid the westland Gro Sure Farmyard Manure.


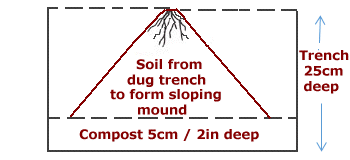
I gradually filled in the triangular sloping mound area as in the diagram on the left making sure I extracted any weeds I saw.


I laid out the crowns with 200 & 400 each end so that I can stagger the pattern when the next 5 crowns finally arrive from Suttons.


Some of the roots had come detached when bundled, and I was incredibly gentle handling them getting them out of the bag they were in, laying them on the mound and then opening them out like a spider on top of the sloping mound. 


I laid them out like spiders as I had seen in the books and the Thompson & Morgan video I posted on my blog in a pervious post about Planting Asparagus


I did receive a piece of paper giving guidance on how to plant and prepare the ground for these in the box the Asparagus Crowns came in, but Suttons could do a lot better and provide some guidance actually on their web site and product page for Asparagus, perhaps with photographs. 

I have fed this information back to Suttons marketing team. Feedback should always be taken as being positive, as it means your customers are engaging with you and letting you know how you can improve the service you provide. 

For a good marketing team there should never be negative feedback.


Better view of the crowns


View up the trench.


Using the rotary sieve I worked the square flower buckets of excavated soil so that I could cover the asparagus in fine soil so that they can easily get through. Due to the heavy rain we've had over the last few days the soil in the square flower buckets at the bottom was very moist and clay like.


The Rotary Sieve is a great piece of equipment and is useful when processing my own compost for use, it is so fast and efficient this one I bought from ebay a few years ago, shipped from Germany and cheaper than the ones available from Wales see post Here .


Once I had the trench more or less level I added two sacks of Equigrow Fertile Mulch, now I have to say these sacks had been near the bottom of the pile, of composts and soil improvers I've had stored for this year, and I was expecting perhaps some consolidation may have happened, but this mulch spread easily from the sacks and I had thought it may have needed some loosening up. 

I love the look and texture of this product, and waiting to see how weed resistant it proves to be longer term, being made with horse manure and fertile it should help my Asparagus to establish themselves, and using Equigrow Fertile Mulch may become an annual event for the Asparagus beds.    


As the drawing on the left I tried to make the mound on the trench 3" higher than the original ground level.

I did spread about an inch thick either side of the trench and in fact took the mulch in the middle of the two beds to the bed edge

I then have the Asparagus a good watering and covered it to stop the foxes from digging it all up. I need to look at the permanent protection solution for this bed to protect it from Basil and his mates.  


Flower buckets of soil left over were stacked along the path to the bed and then the two rows one on the path and the other in the trench holding the sides up were covered in the glass panels I use so they can dry out and not get rained on again. 

What's left over from the first trench will be mixed with coir and some compost and used for the potatoes, wich really should have gone in already!


When going to Plot 1A to collect the glass panels I saw the bluebells in the comfrey bed. I love them they give some early colour and food for the bees, as well as crowding out weeds until the comfrey come and crowds out the bluebells  

Sunday, 3 April 2022

Getting The Asparagus Bed Ready

No allotment this morning, but I got just over 2 hours on the plot this afternoon. I managed to excavate the two trenches and fill them with the required depth of westland Gro Sure Farmyard Manure as the base for my Asparagus that are due this week.

Now I just need to sieve and weed the buckets of soil that were excavated in order to make the triangle of soil to support the crowns 


Marked the sides of the trench and chalked the required depth on the spade then pushed the spade in along both sides of the trench and then perpendicular across the trench.


I weeded as best I could as I excavated and the spoil went in the square flower buckets.


Soil nice and black makes it hard to see the side of the trench in the photographs.


Trench prior to adding the 50mm of the westland Gro Sure Farmyard Manure in the bottom.

Cross Section of the 300mm wide Asparagus Trench.


View up the trench after the first sack of westland Gro-Sure Farmyard Manure was added and compacted in the bottom of the trench.


First trench after the westland Gro Sure Farmyard Manure was added and compacted.


I moved the square flower buckets into the trench as I didn't have the time to add the triangle of soil to support the crowns. I laid out more square flower buckets in the middle strip, marked out the second trench and again pushed the spade into the ground and wiggled to compress the walls of the trench and then cut up along the trench.


View of the second trench once fully excavated.


By now I had lost the chalk mark on the spade but I knew by the concrete on the spade where the required depth was.


50 - 70 mm of westland Gro Sure Farmyard Manure added to the bottom of the second trench.


I managed to just get the westland Gro Sure Farmyard Manure in the bottom of the trench and then covered the trench to stop Basil Brush and his mates from getting into it but I know they will get into the square flower buckets and dig. 

I really need to make up some fencing for this bed to make it Basil proof. Perhaps a job to do with all those timber battens I have been storing for the last few years.