Sunday, 26 February 2017

Greenhouse Clearance Continues


A slower than normal start to Sunday, I arrived at Mill Green around 9:30 to be greeted by the daffs and the bluebells in the Comfrey Patch, I'm so glad that I transplanted them there for a little early growth and colour on the plot. 

It appeared that storm Doris had dislodged the sliding door to the greenhouse at the bottom but thankfully it was still on the runners at the top. Once fixed I set about the continuing mucking out of the greenhouse.

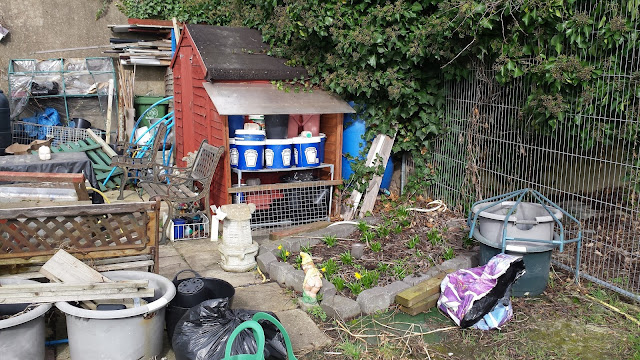
Three sacks of coffee grounds have been sitting in the corner of the greenhouse since last year and I never did manage to get around to dry the coffee. On opening the sacks I found that some areas had clumped together and bonded and other had dried naturally. I decanted the three sacks into six of the blue food containers with lids and placed under the extension to the shed to continue drying out, leaving the lids loose on the tops of the buckets.

There are far too many empty milk bottles stored in the greenhouse and quite a few got filled with sand from old soft bricks (milk bottles filled with sand) that had either become brittle with age and started to split or in the case of the smaller 500ml ones been used by the foxes as toys.

The objective is to clear the greenhouse ready for the SoilFixers Potato in bucket trials and have space for the plants that will be hopefully coming late March early April.  

On the way home a visit was made to Spencer Road to drop off the blue water pipe that I picked up from the dump yesterday and will use to make some small portable hoop frames.

It appears that I have acquired a front panel of a compost bin deposited by storm Doris on my plot. A number of polytunnels got split and some sheds lost their roofing felt.

Saturday, 25 February 2017

Bed 6, Committee Meeting, Rats & Blue Water Pipe


There was a committee meeting on Spencer Road this morning, I popped some plumbing gear to my eldest daughter then made my way to the allotment and managed to get half of bed 6 and its path dug before the meeting. In the process I managed to extract 2/3 of a square flower bucket full of stones that have been left soaking in water to remove the mud before they make their way to the paved area.

Derek showed us examples of how the rats are eating their way into the composting daleks and a rat run and access formed under a shed.


You can clearly see the rat run forming in the grass path and the hollow they have made to make access under the shed easy.

My delivery of SoilFixer SF60 has arrived so the spud testing can start as soon as I finish the clearance of the greenhouse at mill green


In the afternoon I assisted my daughters partner in taking the old washing machine to the dump and in the process spotted that someone had dumped a roll of blue water pipe. So I rescued it and rolled it up tighter and used cable ties to hold it at the smaller diameter and it will make it's way to Spencer Road allotment on my next visit. 

Sunday, 19 February 2017

Clearing Out The Greenhouse

The morning started really well I was up early and on the plot by 8:30, just 45 minutes in and I received a call from the wife who was in a state of distress as she had fallen over and could not get up off the floor. Needles to say, I hot footed it back home, and returned in the afternoon when my daughter was home from work to finish clearing the greenhouse and collecting the rubbish I had cleared.  

Whist home the sprouts were moved on to the space saver greenhouse and the cabbages were sown and put in the portable grow house.

Saturday, 18 February 2017

Timber Roof Batten


I noticed that a couple of houses over the road from me were having their roofs done, the contractor had a skip in the front of the properties, so I waited until the tiles were going on and went over and had a word with the contractor.

It was all going to be skipped the longer lengths are all in excess of 1.2m so I will be able to use them for making fames up to go around the beds and hopefully keep the young foxes off the beds.

Friday, 17 February 2017

Garden Press Event 2017

I managed to wangle an invite to the London Garden Press Event, which is a yearly event aimed at people who write about gardens. Members of the gardening blogging community #gdnbloggers were saying what a great event it was, and we decided that it was a good opportunity for members of the community to meet up, which we did in the afternoon at 2pm

It was also Emma Coopers' Birthday and Beryl over at Mud & Gluts took it upon herself to make Emma a birthday on the basis that you can't have a birthday meet up without cake. We were lucky to meet Emma as she is just at the end of what sounds like it could have been a man cold.

I've known Beryl for a few years now and we have visited each others allotments and exchanged plants and also belong to a number of the same forums and groups. It was so nice to meet up and put faces and personalities to other fellow garden bloggers, as has been so expertly expressed over at The Physic Blogger by Sara Venn


We all sang a hearty rendition of Happy Birthday to Emma, and for a moment all attention from the people on the exhibition stalls and their visitors around us was distracted and on Emma.   

There were a lot of exhibitors there and I arrived about 10:30 after taking a detour to the main entrance above ground that was closed and a guy working on the complex took me through the building to the underpass opposite the entrance to Exhibition Hall 2.

There were lots of exhibitors there more than willing and able to talk about and promote their products. As I was relatively early, I had to do the slow walk looking from side to side to see who they were and what they were promoting, too slow and you would be pounced upon too fast and you did not get time to absorb their displays.

I met and had some lengthy discussions with exhibitors, mainly where the product was of interest and a few that despite informing them I was a blogger that primarily wrote about allotments and I was not really interested in large petrol lawnmowers still insisted in thrusting a bag with promotional goodies in my hand as we departed company.

As a direct result of visiting the press event I will be receiving a number of growing products that I will be adding to my SoilFixer PotatoPot Experiment later in March. 


Above are the memory sticks with marketing material on that I gathered on my travel around the Hall, these are so much better than loads of paper that is heavy, bulky and lets face it primarily just using up trees, they also contain lots of images and useful reference material and I'm going to have fun exploring them.

I will be discussing and reviewing the products and samples that I have been given or are going to be sent to me to trial in later posts.

All in all a thoroughly enjoyable day, and I'm looking forward to next years event and hopefully another excuse for fellow gardening bloggers to meet up again. 

Thursday, 16 February 2017

Year Round Cabbage Collections

Due to the slugs last year I had little success with overwintering cabbage and decided not to even bother over last year/ this year, but I have been looking at trying to extend the harvest period for cabbages, and Marshalls have a  Super Saver Cabbage Seed Collection made up of four separate packs of seeds which is ideal for allotment owners;

Pixie (600 Seeds: Sufficient seed for 100ft/30m row) Mid-green, compact plants producing small wellhearted heads with few outer leaves. A very early variety suitable for close spacing.

Primo 2 ( 500 Seeds: Sufficient seed for 100ft/30m row) An excellent ball-head variety that's ideal for cutting in the middle of summer. Produces large, heavy, solid cabbages with excellent crisp leaves that are ideal for eating raw in salads as well as cooking.

Picador (Approx 50 seeds) Just the job for smaller gardens, the heads of Picador weigh in at around 2lb. It crops from August right through to October with dark green, densely packed heads and a short internal core - so there's minimal waste.

Tundra (100 Seeds: Sufficient seed for 35ft/10.5m row)  The most frost-hardy cabbage. Sown in April to May, it crops from November to late April.


Marshalls Cabbage Seeds Collection (All-Year) can be purchases for £6.75 a saving of £1.85  and you get a massive 1250 seeds in total which are provided in their own individual packs. Those I received have best before dates of 2017, 2018 & 2019.  

This is a huge difference to the Thompson and Morgan offering where you get one pack of three varieties of seeds in a single 35 seed pack for £3.99 and have absolutely no idea what varieties you are actually sowing and planting.

Wednesday, 15 February 2017

PowerBee Saturn Solar Powered Lights


Well back in August I did say that I would let you know how the PowerBee Saturn Solar Lights got on over the Winter. Well they keep alight long into the morning in fact this morning I was up at 5:45 am and the ones that are out in the open and on the fence posts were still shining brightly.

I have to admit I think they are worth the couple of quid extra than buying something of a lesser quality, in fact there are Solar lights all around the garden and only the PowerBee lights are the only ones still working at this time of day, well it's still very dark so night.


These are the hanging Solar lights that I put up last year and in the winter the lights are out by 9 - 10pm. So I had to by the brackets and the lights for seven of these to go around the patio and a further four to go up the path. I also bought a couple of spares as I was unlikely to ever find them again as the came from a B&M Store 


What I would have liked, but at the time PowerBee didn't have any in stock was the PowerBee Saturn Wall Light

I see that they are once again in stock. Once the existing wall lights start not to function I will be investing in the PowerBee wall lights to match the ones on the fence, in many respects I wish I had waited after seeing how well they have worked over Winter

The old security light on my front porch gave out during the summer and I replaced it with a PowerBee Solar Security Product

Despite only getting minimal sunlight because  of the orientation of the front elevation, the light has worked well during the Winter and it is extremely bright.

The motion sensor was extremely easy to adjust and the length of illumination is adjustable.

I can understand why their web sites states "Some of our first customers have Outdoor Security Lights still going strong, We have a very large loyal customer base, who once buy from us, tell us they will never buy solar from anyone else again!"

In December 2018 these lights are still working strong and are still alight in the morning when I get up at 6:00 

A company called SEOSMART kept spamming this page to try and get business, thus comments have been turned off as they are a bunch or arse holes who can not be contacted and if they had sent me something to test and it was any good then I would have posted about there product and not PowerBEE

Tuesday, 14 February 2017

Marshalls Potato Pots & Gro Kits for SoilFixer Testing


A big thank you to Emma the PR Manager for Westland Horticulture for arranging for some trial products to be sent to me after becoming aware of the SoilFixer SF60 Potato bucket trials I will be undertaking from March this year.

2 x Potato Charlotte Gro Kits
2 x Potato Grow Pots - Triple Pack

The Marshall Potato Pots was the winner of RHS Chelsea Flower Show Product of the Year 2015, this innovative growing method for potatoes is all you need for efficient and no-waste harvests.

I will not be using them for successional or no-waste harvesting of the spuds but to have a sneak peak at what's going on during the tests.

When the SF60 arrives late February / early March I will not have the CHA Compost Humification Agent charged compost ready until next season, so I'm thinking of applying the SF60 at the minimum of 5% in one bucket and Maximum of 20% by volume in another bucket to see what difference it makes.

The test mixes for Mill Green Allotment will be;

1) Verve Compost & Coir with Marshalls Potato Fertiliser
2) My Own Compost & Coir with Marshalls Potato Fertiliser  
3) My Own Compost & Coir with SF60 & 5% by volume
4) My Own Compost & Coir with SF60 & 5% by volume
5) Own Compost & Coir with SF60 & 20% by volume
6) Own Compost & Coir with SF60 & 20% by volume

I'm going to run the same test mixes in Potato Charlotte Gro Kits on Spencer Road Allotment using the compost I made last year. The Charlottes are happily chitting away in Grow Station 2 at the moment.

My plan is to repeat the experiment next year but comparing;

1) B&Q Verve Multipurpose compost & Coir
2) B&Q Verve Multipurpose compost & Coir & SF60 
3) My Own Compost & Coir
4) My Own Compost & Coir with Marshalls Potato Fertiliser  
5) My Own Compost made with CHA & Coir  
6) My Own Compost with CFA & Coir & SF60

And see what the difference in terms of harvest weight, numbers of potatoes and size of spuds.       
   

Planning & Reviewing Previous Years

A little late with the February review, note to self do it at the start of the month from now on ......

Reviewing the diary over the last four years for February

2013 - Planning, Infrastructure Works, Paving, Building a Cold frame, Wood chipping paths, Clearing Plot    

2014 - Transplanting Bluebells,  Planting Trees, Paving & Erecting Greenhouse Base

2015 - Sowing Cabbages, Digging Beds, Sowing Lettuce, Cauliflower, Chitting Potatoes, making Hoop Frames, Onions from Seed, Painting the Shed, Building & installing Raised Beds.

2016 - Base for the shed on Spencer Road. Erecting the Shed, Trimming shaggy weed membrane, gathering compost paper & Coffee Grounds.  

As with January so much depend on the weather, but the objectives for February 2017 are in many ways similar to those in February for the last four years, so here is the to do list in no particular order and catching up with what actually happened in Jan and what slipped.

Spencer Road
  • As much infrastructure works as the weather will allow - Ongoing
  • Raise the paving for the greenhouse- Ongoing
  • Weed the area and create Beds 6 & 8 for the onions - Not started too wet in Jan
  • Make another 2.4m x 1.2m Onion Planting Membrane - too wet in Jan
  • Make Walking Onion raised bed frames. too wet in Jan
  • Prepare Asparagus Bed
Mill Green
  • Tidy Up the Allotment - Ongoing
  • Clear The Greenhouse - Ongoing
  • Hoop Cages and Netting for Onions from Mill Green to Spencer Road - Not Yet
  • Drain and Move Nettle Water Butt to Spencer Road - Not Yet
  • Install hoop eyes and training wires for trees - Not Yet 
  • Prepare Cauliflower Beds
  • Warm Up Carrot Bed
  • Trim the grapevine Back
Home
  • Clear the crap out of the sheds - Not Yet
  • Find a new home for lawn mover - Done
  • Set up growing station in the brick shed - Done
  • Sow Sprouts - Done
  • Chit Potatoes - Done
  • Sow Leeks
  • Sow Cauliflower
  • 2nd Sowing of Sprouts
  • Sow Cabbage
  • Sow Sweet Peppers
Reminders
  • Already stocked up with coir for 2017, but I will need to replenish for 2018 - Started
  • I have another green house so will want a few more of Digital Thermometer from Lidl - Done
  • Check condition of saved seed potatoes in the shed after heavy frost - Not Yet 
  • Purchase vent opener for new greenhouse.- Not Yet 

Monday, 13 February 2017

Chitting Spuds in Grow Station 2


This morning I had an Eureka moment with regards to Grow Station 2 and have decided that the shed being just over a degree warmer than outside and with the lights during the day and the heat mat during the night when a frost warning it's the ideal place to chit my early spuds for the start of the SoilFixers SF60 trials early next month, by which time hopefully the night time temperature will have improved.

The sun is out there is little cloud cover and the outside temperatures are much better today at 1:30pm being 7.8C outside an average of 10.44 in the greenhouse (5 readings) and 14.45 in the Grow Station 2 Shed (4 readings)

Temperature difference between outside in the shade beside the greenhouse and in the shed with the sun on it is 6.65 degrees Celsius.

Researching Grow Station 2 Update

I decided that I would monitor the effectiveness of the heating mat over a longer period of time and without keep opening the door and letting what ever ambient heat there was out and the cold air in the shed. So I took readings at 11:00am and again at 5pm so that's a six hour period twice as long as previously, and here are the results


Tray           1      2      3     Mat
11 am    - 2.8 / 3.0 / 2.9 /   2.9 outside temperature 1.7 Celsius I then turned mat on

  6 pm    - 8.5 / 6.9 / 7.8 / 15.8 outside temperature 2.7 Celsius
Increase  5.7 / 3.9 / 4.9 / 12.9                                  1.0

Average Increase in trays = 14.5 / 3 = 4.83 - 1.0 increase outside = 3.83 Celsius which is comparable with the three hour results and I don't anticipate it getting better with the current set up.

Sunday, 12 February 2017

Tweaking & Researching Grow Station 2


Placing a larger piece of wood across the top of the freezer I will be able to get three trays, the heat mat can cover two trays completely of one in the middle and half of the trays either side .

I need to find a new home for the tree pruners and the garden rake, but that's a job for better weather as I need to clear the other two sheds that a full to the doors with junk.

As I said in a previous post there was confusion re the units of measurement of the temperature of the heat mat and I'm only looking at getting an increase of about 5.5 - 11 degrees C to the ambient temperature, half of that I was expecting.

Using a couple of the Lidl digital thermometers (I added a second after taking the photo) I have taken readings from the left side Tray 1 / Tray 2 / Tray 3 / on top of the mat between the mat and the corner of the mushroom tray over a three hour period and here were the results

Tray     1      2      3     Mat
3pm - 2.6 / 2.8 / 2.6 /   2.6 outside temperature 1.5 Celsius I then turned mat on
4pm - 5.0 / 5.1 / 4.8 / 12.0 outside temperature 1.5 Celsius
5pm - 5.8 / 5.2 / 5.6 / 13.1 outside temperature 1.5 Celsius
6pm - 6.4 / 5.5 / 6.1 / 13.6 outside temperature 1.3 Celsius

So although I could not feel the benefit of the mat with my hand there is an average increase of 3.39 degrees C in the trays over a three hour period. The temperature slowly continued to increase with time even when the outside temperature was falling between 5pm - 6pm.

I will re run this monitoring during a day over a longer time and see what happens beyond three hours, and without the associated heat loss from opening the door every hour take readings.

The timber will get battens screwed to the bottom either side of the freezer so that hooks on top and can't move sideways. I shall be lining the back wall and left wall and the underside of the shelf the light hangs from with white correx ( the stuff Estate Agent for sale signs are made of) to reflect the light.

At the moment the temperature obtained in the shed isn't enough for germination but may be OK for continued growth after germination, I think I need to look into that. If you have any views or opinions let me know in the comments below.

I may still look at a greenhouse tube heater with thermostat something like this to boost the ambient temperature to see if I can get nearer the 15 - 20 degree mark, again if you have used one of these tube heaters and think it would get me there please let me know before I sink another £20 - 30 into this grow station.
  

Friday, 10 February 2017

Brick Shed Grow Station 2

I finally made space elsewhere for the lawn mower that used to sit folded up on top of  the small freezer in the outside brick shed. The space release is not as large as I was visualising, actually putting it another way until they turned up I didn't realise that the two bulbs would be quite as large and take up quite as much room as they do.

The Lamp Socket Converter Bayonet / Screw & the Mercury Switched Clip on Lamp Holder (see post here) didn't really hold the lights as I wanted as the whole thing was a little bulky and wobbly at the converter. and the direction of the bulbs in relation to the Clip on Lamp Holder was all wrong, so I bought a E27 Pendant fitting with lead switch and 3 pin plug which arrived yesterday and a hook was screwed into the  underside of the shelf, an knot tied in the wire and hay presto we are in business.

I cut a timber to go on top of the fridge to protect it from the heat from the heat mat.


The heat mat was unrolled and a mushroom tray with soft bricks placed on it to flatten the mat as it has been rolled up in a box and would not initially lay flat. I left the heat mat on for a while, it had not warmed up that much, but it had flattened when I removed the mushroom tray & weights.  


There was that confusion about Centigrade and Fahrenheit, when I bought the heat mat the box states that "it warms the root area 10-20 degrees above ambient temperature" and I thought it was Centigrade as the dimensions were in mm on the box but on closer inspection printed on the mat, it states Fahrenheit, which real terms we are only looking at an increase of about 5.5 - 11 degrees C from the ambient temperature, half of that I was expecting..


I have purchased a E27 Light Bulb Lamp Holder that I will wire and screw directly under the shelf lifting the light up further away from the top of the little freezer.

Two full seed trays fit on top of the fridge under the lights comfortably so that's 30 vending machine cups in two 15 tray modules where I can start stuff off early.

I just need to get the greenhouse erected on Spencer Road so I have somewhere to farm it out to when they start getting a little larger.

Thursday, 9 February 2017

Sowing Brussel Sprouts

Brussel Sprout Update, Ok I have just heard that Marshalls are sending me a complimentary pack of their Super Saver Duo Pack which contains a pack of Cromwell & Montgomery Brussel Sprouts with 40 seeds in each pack for the bargain price of £3.70 that's £1.20 cheaper that buying them separately Click Here to see on the Marshalls website.

A big thank you to Emma for arranging the complementary items.

Unlike the Thompson & Morgan All Season Sprouts and Cabbages fiasco where you get 30 seeds total of three varieties but they are all mixed in one pack! You actually get two distinct packs of 40 seeds so you know what you are sowing, planting, growing and finally eating.


Marshall's state that their Brussels Sprout varieties have each been selected for their superb flavour, and I'm looking forward to tasting them between September to December this year.

General guidance for all sprouts is to grow tightly packed sprouts, firm fertile soil is essential. Dig in plenty of well-rotted manure or compost as early as possible to give the soil the maximum time to settle.

Sprouts are an excellent source of vitamin C and are packed full of vitamin D, folic acid and are high in antioxidants. Like a puppy, Sprouts are not just for Christmas but unlike a puppy they can be consumed all year round!

Cromwell - Marshalls - 40 Seeds - Best before 9/2018 - A heavy cropping variety.
Sow Indoors Feb - Mid March

Sow Outdoors - Late March - April
Plant Out April - May after last Frost
Germination 14  - 21 Days 
Harvest September  - December 

Montgomery - Marshalls - 40 Seeds - Best before 9/2019 - British-bred and heavy-cropping variety.
Sow Indoors Feb - Mid March
Sow Outdoors - Late March - April
Plant Out April - May after last Frost
Germination 14  - 21 Days 
Harvest November - December

So the Duo Pack gives a Harvest from September to December adding the varieties I have already got seeds for, the harvest period is extended from September to February, perhaps Marshalls may add an additional pack in the future to extend their harvest range a little further?
  
Eveham Special - Premier Seeds Direct - 400 seeds Sow By 2018
Sow Indoors Feb - Mid March
Sow Outdoors - Late March
Plant Out April - May after last Frost
Germination 14  - 21 Days 
Harvest September  - December 

Bedford Darkmar 21 - Just Seeds - 400 seeds Sow By 2018

Sow Indoors Feb - Mid March
Sow Outdoors - Late March
Plant Out April - May after last Frost
Germination 14  - 21 Days 
Harvest - Mid-November to January 


Rubine - 100 Seeds Sow By 2017
Sow Indoors Feb - April
Sow Outdoors March - April
Harden off once 150mm high
Plant Out April - May after last Frost
Germination 14  - 21 Days 
Harvest - November - January 


Brest F1 - 40 Seeds Sow By 2018
Sow Indoors March - April
Sow Outdoors April
Harden off once 150mm high
Plant Out April - May after last Frost
Germination 14  - 21 Days 
Harvest - November - February

I now have six varieties of sprouts to try and I have a 15 Module tray in the Portable Grow Station, so I will sow three seeds of all the above with the exception of Breast F1 which has a sow indoors date of March.  So that's five varieties and I will need two of each to fill the 10 holes in the sprout weed membrane. 

A second sowing will take place in 14 days - 21 days, by which time hopefully I will see how well the germination is or isn't. If I get a bed ready for the end of April I may even have a bed of 10 sprout plants on both plots.

Wednesday, 8 February 2017

LED Portable Grow Station

The urge to sow something is very strong, and I have not been able to clear the outside brick shed in order to set up a grow station, however in the process of clearing the office I have emptied a plastic storage box and have decided to use it to create a portable grow station.


I've fixed the LED panel that I bought on ebay a little while ago to the lid of the box using paperclips straightened with a hook at the end then using the hanging hole provided for the hanging wires. Then through holes I melted in the lid with my trusty soldering iron to line up, bent over on the outside and gaffer tapped down to prevent them slipping or moving.


As it happens the panel sits on the profiles that allows these kind of boxes to stack, but having the panel fixed to the lid will prevent the LED panel from slipping in and killing any seedlings 

A full tray fits comfortably in the storage box and I have an upturned tray and module liner as packing bringing the double tray with module liner and vending machine cups up close to the LED lights. So the plan will be to remove the middle module tray packer as the plants grow. 


At the moment I have the grow station sitting on another storage box at the end of my narrow office next to the radiator and the window, but I can relocate it in the outside store or in the spare bedroom if needs be.

So now all I need to do is fill the vending machine cups with a mixture MPC and seed and cutting compost and sow the Brussel Sprouts.


Monday, 6 February 2017

Paved Area Extended


It was dry and sunny this morning so an hour and a half digging and weeding, and extracting three square flower buckets of hardcore material out of a section of boundary strip between my plot and my neighbours about 450mm wide and 2.4m long.

This resulted in me being able to rough level the remainder of the paved area.

When I start using the Rotary Soil Sieve I will extract plenty of smaller stones to fill in the void areas under the slabs.

Here is the state of play when I left to go home for lunch.

And this is where the greenhouse will stand with door on the leeward side

Sunday, 5 February 2017

Finally A Sunday Visit

With man colds and bad weather I have not really been able to make any definitive headway on either of the allotments for the last couple of weeks, now Bessie (Vauxhall Zafira) is insured and on the road, I had four large black sacks of shredded paper and a kitchen compost caddy full to the brim to drop off the Spencer Road allotment.

The overhanging material from peoples plots and the stuff stored behind the sheds is going to make it impossible to back down to my plot without damaging Bessie's paintwork, so until the offending plot holders have done something about it, looks like the car will remain on the road and I will have to carry things to and from the plot. It's a shame as its so easy to take the car in for dropping off and picking up and it was one of the things that attracted me to the site in the first place.

That said I trudged carrying said four sacks a kitchen caddy and a Jute bag with flask and other stuff that needed to go to the plot and set about filling the wheelie bin with the sacks of paper. Some food buckets with lids full of rock salt were used with the aid of gravity to compress the paper in the bin.  

The plan was to go to Mill Green to continue with the weeding and clearing of the greenhouse.


.
The reality was that I made some more soft bricks with the dried sand and milk bottles and I was about to put some of the ballast in the trays to dry and thought, I will work on finishing the small strip of 300m wide paving slabs whilst I wait for gravity to do her stuff


After completing the 300 x 300mm slab strip, I lifted the 600 x 600mm slabs and stacked them against the shed and then proceeded to round up all the lumps of concrete, broken paving slabs and stones scattered around the plot in various containers that have been used for weighing down tarps and plastic sheets and started placing them on the membrane where the joints in the slabs will be.

So the result is that the first two rows off the 300 x 300mm pavers are now laid to a rough level. Three are completely supported and one from the first row and the whole of the second row are only supported around the edges, but I now have a level to work too when filling the void under the slabs with more stones and debris as it comes out off the ground.

So the possibility of getting the greenhouse base in and the greenhouse erected by the end of March - Mid April is looking good, if we get some dry weather. I will try and dig the margin between my and Adams plot as soon as the weather turns for the better as I know there are lots of bits of paving slabs and debris in that area.

And the bed head up against the shed, well that's another project,  a small bench is going to be made from the old bed frame when I get time, not that I actually sit a lot when I visit the plot you understand.  

Friday, 3 February 2017

Collecting Compost Ingredients

As a result of the need to clear my office so that the contractor can get to the water system drain point for the bathroom conversion to wet room, I'm finally spending time clearing it out of stuff that is out of date or not needed anymore. As a result I am producing a shed load of shredded paper, and have another 3 sacks to take to the allotment.

Unfortunately I have run out of the buckets with lid that I usually compress the paper into, but the good news is the wheelie bin I acquired will hold black rubbish sacks which I intend to squash and compress by putting some heavy buckets with lids on so that I can store as much browns composting making material as possible ready for when we finally start cutting the grass again and I have an abundance of greens.

I would like to build a bigger stock pile of hops, but space is a premium at the moment and I don't want to clutter the plot any more than it is at the moment, I need to remove the existing pile of hops from the paved area so that I can continue with the levelling process.

What I do need to do is find an alternative source for coffee grounds