Showing posts with label Plot 1A. Show all posts

Wednesday, 22 December 2021

Plot Layout for 2022


Playing Around with the Bed arrangements and updating the layout of the allotment based on what I think I'm going to end up building in 2022. The entrance and left side of Avalon is Plot 1 and the right side is Plot 1A


This is what it looked like before I took it on. 


Taken by Plot neighbour in January 2021 


Plot 1 layout for 2022

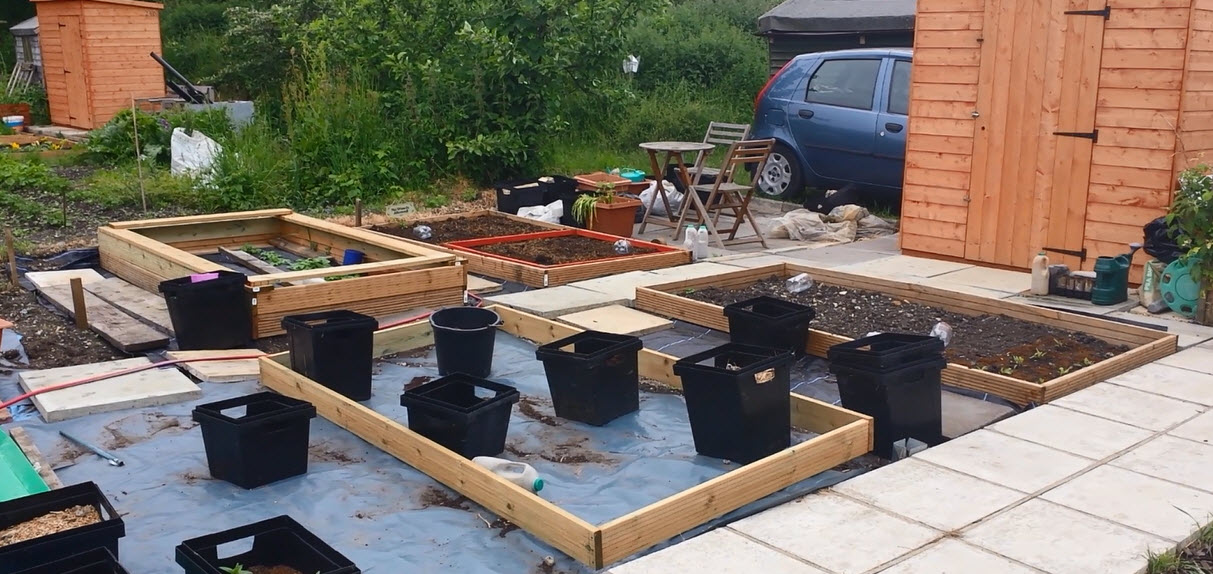
Superdome Tunnel and SFG Beds 1 - 3 to be installed over Winter and if possible the 6' x6' or 1.8m x 1.8m Greenhouse Frame to be erected in the corner once the ground has been dug and weeded.  


Plot 1A Layout 2022


Google map measure

Sunday, 25 February 2018

Free Timber & Babington Leeks


Builder behind my plot asked, "Would you like some timber joists to use for your raised beds?" I was around there like a flash and only had to put them over the wall. All nicely stacked up and ready to cut to size now.


I know we are supposed to be getting 8" or 200mm of snow this week but I thought I better start warming the beds up a bit so I dug out the solar tents and then went about filling 8 milk bottles of sand to hold them in place against the wind. The path between the beds has membrane in place and a slab either end, I just need to lift the slab on the main path and tuck it under before the woodchip goes in when it comes.


The frames to beds 2 &3 have now been screwed together and the weed membrane between beds 2&3 and 3&4 has been laid and a paving slab placed at either end waiting for the next delivery of woodchips. I need to find a couple of membrane sheets cut to bed size but for the moment I'm leaving be 3 open to the elements. 


Gerry the kind gent who sent me the Walnut Trees also sent me some Babington Leeks your supposed to plant them about 200mm apart but for the moment I have them in flower buckets filled of my grade 1 home made compost. I should be able to collect the bulbils about July/Aug and plant some for next year.  Dig up the cloves in Autumn and leave a few to produce leeks in late winter. 

Here is what I have found out about them, apart from they are very much like Catawissa Walking Onions with the bulbil at the top 

Babington leeks, Allium Ampeloprasum var Babingtonii, is one of the tastiest and easy to grow perennial vegetables. Named after Charles Cardale Babington, this wild and hardy perennial leek is a native sea shore plant and perennial ancestor to garden leeks. It is extremely low maintenance and ideal for polyculture spaces as it will thrive between other plants and can tolerate a range of soils and positions.

How to Grow 


When your bulbils arrive you can sow direct about 8cm deep allowing 8-10cm space between each bulbil. Alternatively you can sow the bulbils in a roomy pot and just leave outside, when tips emerge, you can carefully separate out the sprouted bulbils and plant them as above. They will remain dormant until late Autumn/early winter, when you should see the first growing tips emerge.
How to Harvest 

Mark where you have planted them so you can look out for growth appearing. The first appearance of Babington leek shoots can vary depending on your local climate and region with first shoots as early as October right through to December/January.
How to Propagate New Plants 

Babington leeks are so tasty that you will want to harvest them all, but if you want to increase your stock quickly you need to let some of them flower. The leeks will throw up a very tall stem around July time with very attractive purple flowers. These in turn go on to produce a head of bulbils, each bulbil producing a new leek. The head will naturally bend and plant itself or you can gather bulbils and separate them when the cases are papery and sow in a new spot. As the plants mature, they produce a very large underground bulb with a cluster of ‘mini bulbs’ or offsets which will form clumps of new growth above ground. You can lift and separate and move bulbs around when they are in their dormant stage. You will find leeks popping up in strange places as bulbils sometimes get flung a distance, but it is exciting when that happens! It takes patience to establish a Babington colony, but well worth it and you will have them forever. The life cycle of the leeks is: Emerge in late Autumn/early winter, harvesting period March to June, flowers emerge July to August ( from plants that have not been cut for harvesting), Bulbils can be collected in August, plants die back by end of September. As each year passes the underground bulbs become larger. Timing of growth/flowering cycle may vary according to your location and temperature.

How To Eat

Babington Leeks – flowers, stems, bulbs and bulbils are all edible. The leeks have a deep savoury taste and make the most delicious base for soups, are great in omelettes, or just simply sautéed in a pan. They have a garlicky hit too which just adds to their many culinary uses.

I also managed to clear a little more of the area behind the shed and have installed a couple or polycarbonate sheets on the gap to create a dry storage area. 

Next visit to take down the sprout cage from bed 12 and install on bed 2, and cover Bed 7 & 8 with glass panels to warm the beds up.

Saturday, 13 January 2018

Size Is Relative

This morning I had a committee meeting on Spencer Road Allotment. I took the opportunity to ship eight kerb edgings and some of the contents of the shed from Spencer Road to Mill Green Allotment.

It makes sense to move stuff with every visit, the thing is I only really need to visit Spencer Road now to move stuff I want to keep, and to undertake minimal work to keep the weed down so that my plot does not become a problem for those around it, I've been there had that one done to me and I really don't want to become a problem neighbour, before I give up the plot. 

The Catawissa Walking Onions are already growing and it will be a shame to leave them on the Spencer Road plot  but I do have the next generation in the Space Saver Greenhouse in the back garden and I need to form the bed for them on plot 1A at Mill Green sooner than later.


I had trimmed up the offcut from the second strip of weed membrane with a soldering iron at home during the week, as it was so shaggy. The trimmed offcut can be seen in the photo above, up against the wall on the right of the photo on the boundary between plot 1 & 1A.

This sheet of weed membrane felt like it was huge whilst I was working on it in the back garden, but out on the allotment it's covers very little ground, and felt so small and really proves that Size Is Relative.

I marked the wall with chalk (highlighted on the photo) and measured the length of the wall at 8 metres. I needed to verify the length, so that I could cut to the required two lengths off the 2m wide rolls I have purchased. These length will be used to cover the area where the shed and greenhouse is planned to go, and the OS map is out a little as I estimated 9m lengths would be required.

Ultimately I need to measure the plot and work out the actual area I have as I have found that most plots are much smaller than what they charge you for, but no one from the council has ever actually measured the plots. .


Due to the shape of the plot of land that forms Mill Green Allotments, every plot is a different size but they are all charged out at the same area, unless you have measured the plot and inform the council / Idverde what the actual size is.

Sunday, 22 October 2017

Winter Cleaning & Spuds

Today has been surprisingly mild and was initially overcast but the sun did shine for a short time. Up early and down to Spencer Road allotment at around 8:15am to dig up the last of the spuds, which was rather a waist of time and over 85% of the harvest had been nobbled by worms and had holes in and many were hollow. I did find on worm half in and out of a spud and pulled him out to see how long he was, the answer was surprisingly short ,and he appeared to have reduced his diameter by about 50% as he fattened up on pulling him out!

I removed as many weeds as possible around the potato bed and then sprayed all the couch grass and weeds that are starting to invade the plot. I may not be keeping Spencer Road on after next year, but I don't want it going the weed for the next owner if I can help it.

I can't see it happening but if I can get all the slabs and shed over to Mill Green before March I will give the plot up early.

So the short drive to Mill Green and the plastic edging that has now been replaced was trimmed with the new saw and now the weed membrane is framed and the soft bricks and bread baskets are holding them down against any more storms


The tarp is covering the cardboard on the path as I need to assemble the raised bed covered with the netting and cut some 600mm wide weed membrane for the path at home with the soldering iron and lay and cover which is a job for another day.


Beds 1 & 2 and the paths around them and around bed 3 were my targeted area with what remained of the morning when I arrived at 10:30am


So some time later all the sweetcorn had been cut up into about 40mm sections and added to the Dalek next to the Comfrey pipe along with a generous layer of comfrey to act as a composting activator. The paths are now weed free and again waiting for me to cut some weed membrane so they can be covered and paved, the aim is to have the whole of plot 1A paved by Christmas. The bean stalks from knee to shoulder height were removed and the top section of beans are now left to dry so that I can harvest some been seeds for next year. 

Sunday, 15 October 2017

Removals Day 1


Today my future son-in-law Andy supplied some welcome muscle and his van and we removed the decking and a large quantity of cardboard, weed membrane cut to path width size and paving slabs from Spencer Road Plot 23B and brought it over to Mill Green Plot 1A. The new incinerator that I bought for Spencer Road also made the trip back as I will need it in addition to the existing rusty one at Mill Green to burn the weeds once I start attacking Plot 1

As you can see in the photo above Plot 1 on the left of the picture above and in the background in the one below still has not received any attention, and I'm just waiting for the paperwork to arrive before I start attacking it.


The plastic strips that have been defining the edge of the beds were eased out of the ground and the timber decking bed edges were re assembled and put in their stead. The weeds along the paths were removed and cardboard already cut into 600mm wide strips were laid along the paths.


This was then covered in weed membrane and the slabs placed along the paths on a semi hit and miss basis to hold the weed membrane down. the tarp in the left is covering cardboard on the path until I can cut some membrane and then the paving slabs stacked by the incinerator in the top right of the photo above will go down on top.


Excess cardboard for the moment is now stacked in the greenhouse ready for more paths to be installed like the one between beds 7 & 8 in far left of the photo above, parallel to the sweet corn to be done, once the decking board edging has been re assembled and installed into beds 7 & 8 and I have cut more path width weed membrane.

The slabs will have the gaps infilled with woodchip when we arrange a drop in the new drop off and pick up area. 


The three paths between beds 2-3, 3-4 & 4-5 and the path parallel to the wall where the runner beans are grown have not yet been touched and are still very weathered woodchip that is degrading to nice compost and supporting weed growth. 


Weedy Path between beds 2 & 3 in the distance


Tuesday, 3 October 2017

New Tenants & Beetroot Harvest

Sunday morning on Mill Green with a little rain first thing to meet Rob someone who has been on the waiting list since the 2nd June which I only found out about recently as Idverde have not been doing what they have been contracted to do and actually manage the allotments!.

Rob is very keen to get cracking and my only hope is that Idverde will process his paperwork swiftly as they can not deal with other outstanding issues I have because its all about sending out the invoices at the moment.

Once Rob had gone, I looked at the second bed of sweetcorn and it's still not ready and I fear may become squirrel food before I get to anything useable. Then it was off to Spence Road Allotment to harvest the last of the cucumbers and beetroots there. I ended up with a food bucket and half of beetroots of various sizes.

All the jars were rescued from the shed, washed and sterilised.

Rather than boil the beetroots or do the microwave thing I tried last year, this year I followed the advice from the Sarsons web link that someone kindly uploaded to the Grow Your Own Grapevine Forum where it advises "Heat the oven to 180C/160C fan. Carefully wash the beetroot then wrap in foil and bake for 1hr until tender. Set aside to cool then peel off the skins." and I have to say I placed them in trays and put foil over but cooked for and hour and a half as some of the first batch were massive.

What a difference, not a lot of steam, no mucking about, in and out of the microwave definitely they easiest way to process beetroots, and the skins came off so easy. I bought the Kitchen Food Tomato Fruit Egg Vegetable Slicer Slicing Helper in the photo above from ebay for between £2.30 to £6.99 with free delivery, but it made handling and cutting the beetroots so easy, and was well worth the money. The larger beets got cut down into segments that would fit in the cutting guide. 

With the Sunday afternoon and Monday evening processing I've ended up with 16 Jars of beetroots that have been, or will be distributed around the family. Based on how keen everyone is to have them I'm thinking another bed and successional sowing is in order next year to aid in the processing.

Sunday, 24 September 2017

Ten Soft Bricks Standing On A Bench

I arrived at the plot around 8:30 and left at 1:00, my brother and sister in law were on their plot so there were a couple of tea and coffee brakes during the morning.

I took a bucket and a half of apples and compost material including three sacks of grass cutting with me and with what I cut back on the plot managed to fill up double Dalek 6 and Dalek 4 to the brim again.

The comfrey was trimmed and topped off Daleks 4 & 6 and Alan's golden magic was diluted and added as an activator

I harvested beetroots that were large enough, but found that many have been nobbled or were in the process of being nobbled by woodlice.

The weeds are going bonkers in the paths and as fast as I'm clearing them they are returning with a vengeance.

The ex- woodchip paths as now such nice nutrient rich material that they are supporting weed growth.  I think that could also be the reason I've experienced woodlice attack on the beetroot as the large woodlice population now have very little to munch on.

As soon as the drop off and pick up area is completed I will be arranging a deliver of woodchips and completely re laying all my paths, bagging up the existing paths for adding as browns in the Daleks.

The last of the runner beans were harvested, and also started to fill up Dalek 1 to around half way with runner beans foliage and sweetcorn stems. Cucumber and Gherkins were harvested, but I didn't get time to dig up any more spuds, a job for another day.  


Ten Soft Bricks Standing On A Bench

I had the song "ten green bottles" going through my mind as I typed the title to this posting. It was so easy to fill empty milk bottles with the dried out sand from the old bottles that had become brittle and split.

They have done quite well as I started making and using them in 2013, so I'm guessing I will have a rolling programme of recovering old soft bricks, drying the sand and making new soft bricks from now on. 

As I was clearing the greenhouse further I found a new bag of sand, but it was still too damp to make filling the milk bottles easy, so all the now empty metal trays have been re charged and hopefully in a week or two they will be dry enough for me to fill another batch of empty milk bottles. I will need some extra for holding down the bed covers over winter

I used up the large pump action weed killer on the remaining weeds on the paths and on the boundary with my neighbour who has not returned since spring. I have my name down for his plot and I'm aware that the 28 day Notice has expired and that a Notice to Quit, has or will be sent shortly, then when I get the paperwork I will be at liberty to attack the plot, bush cut all the weeds back and have a nice big bonfire, and start clearing and getting ready for next year. 

Then the fun will start as I will have to move everything from the Spencer Road plot to my new plot at Mill Green. At least it will be easier to keep an eye on one large plot rather than splitting my efforts between two plots.

I have four and a half hours of sheer joy in the sun and a lovely bright and sunny and warm 21 degree C Autumn day, and lets hope this lasts a little while longer.    

Thursday, 21 September 2017

Crop Rotation

It's that time of year when I start to look at what's going where on the plots next year and below is the first stab for Mill Green Plot 1A in 2018.

My crop rotation is based on four beds of spuds, 12 full sized beds so a three year rotation clockwise with everything moving along four beds each season  


2018 Preliminary Plan

On the basis that I will keep on Spencer Road for one more year. At the moment I have no idea if my neighbour is going to give his plot up, but you can see my thinking if he does. If it happens then his plot is larger than mine and I will have a wealth of space to move into, once it is cleared of all the brambles, Nettles, bind weed and couch grass.

There will be a bed of spud or two at Spencer Road this year and the spud beds have reduced from four to three on Mill Green this year.

The tomato grow house has been replaced with a potting bench / work station and there is another large Dalek no 6 that needs to be added to the layout shown above, The Cherry tree in the bottom left corner has been donated to my brother-in-law.


2017 Plot 1A Plan

Four Beds of spuds planned but due to the wife being taken into hospital only two actually made it into the ground on this plot and two beds on Spencer Road, Bed 7 became Cucumber, Gherkins and Sweetcorn.


2016 Plot 1A Plan

Only three beds of spuds with first early potatoes being grown in buckets, First year for Butternut Squash and gave up on strawberry bed.  


2015 Plot 1A Plan

This was the year I added the Tomato Grow House against the wall, and only three beds of spuds with first early potatoes being grown in buckets


2014 Plot 1A Plan

This was the year I lost Bed 6 to the Greenhouse and bed 5 became the Strawberry bed


2013 Plot 1A Plan


2012 Plot 1A Plan


2012 Plot 1A Original thoughts before clearing the plot

.

Sunday, 17 September 2017

Bench To Potting Bench


Another Sunday morning on Mill Green Allotment. This morning I re assembled the bench but as I already have a bench for sitting on this one is going to be used as a covered storage area and an onion drying rack located the back of the potting bench. 


I screwed on a couple of timber uprights to the front of the bench, then added a horizontal roofing batten between to support the sheet of twin wall polycarbonate sheeting that has been sitting next to the shed for the last couple of years looking to be used somewhere. I added a similar horizontal batten to the back of the bench.

I drilled and screwed the polycarbonate to the battens with cup washers so as not to split the polycarbonate and to spread the load in case of wind uplift. There is enough of a slope for the rain to run off, and to keep anything stored on the bench or below it dry. More by chance than design the taller flower buckets just fit under the front batten so whatever I store in there should remain dry and rain free.

At the moment the buckets are full of empty milk bottles awaiting sand. The broken brittle soft bricks (milk bottles full of sand) that were made in 2012 & 2013 have finally gone brittle and have started to degrade so as they split or break they been stacked in the greenhouse.

The sand has now been emptied into steel trays so the sand can continue dry out in the greenhouse. So the plan is to decant the dry sand into the new milk bottles on the next visit to the plot to refresh and increase the amount of soft bricks I have to hold down weed membrane and netting over hoops

The red container on the table under the bench holds empty pop bottle slug traps.

Bed membrane sheets left to dry in the greenhouse were brushed off folded and stored in the shed, and gradually the greenhouse is becoming less full and before next season will be ready to take the overwintering spring onions and walking onions that are currently housed in the Space saver greenhouse at home. 

Sunday, 10 September 2017

Growhouse Clearance

This Sunday was dedicated to clearing all the dross that had accumulated in and in front of the old grow house.


As we have some new garden furniture I've taken the old stuff down the allotment and have installed it where the old grow house was to use as a potting table.


Rain and time stopped play but a bench will stand on top of the table. The plan is to extend the height of the bench so that I can fix a roof on it, like the extension to the shed in the photograph at the top of the page. I should then be able to use it for drying off onions and hardening off plants early in the season.

There is enough room under the bench / potting table for 30 of the food buckets that I store Coffee, Coir, Composting Materials and Shredded paper in so that the grow house extension to the shed can once again be used for growing tomatoes in next year.   

Up until a couple of weeks ago when it was confirmed that we would be getting the drop off and pick up area, I had thought that I would have to give up my little kingdom at Mill Green, and for the last two years I have been working on making my plot at Spencer Road as a replacement for Mill Green.

But now I will not have to give it up and in fact I will only keep Spencer Road on for another year, which will give me time to bring all of the slabs that I have accumulated over the last two years from Spencer Road to Mill Green and then I will not have to worry about weeds in the paths so much.

I now have a renewed interest in getting Plot 1A back to its former glory for next year, hell I may even get to empty the greenhouse of rubbish and use it for growing as I will be able to access the plot on a more regular basis, especially once the construction works comes to an end near the entrance next year. I have had my name down for the overgrown plot next to mine for the last four years, and if the current tenant gives it up, I will be able to extend plot 1A

I took grapes home and the conclusion was they didn't taste good enough and they have too many pips, I don't make wine and I'm not looking for a seedless variety to replace it with, so I shall cut back and remove the vine and replace it with Raspberries that my daughter and my wife will eat or perhaps try the polar berries that Marshalls are sending me in there. 

Monday, 4 September 2017

Harvest Time & Fighting Fires


Today was spent harvesting a bed or Sarpo Spuds and I have to say they did really well. I managed to get three buckets of spuds out of a 2.4 x 1.2m bed planted with 18 seed potatoes.

The seed potatoes were egg sized spud that I had saved from last years crop. Saving my own seed potatoes is not something that I will do every year but it was an experiment and it worked fine and dandy.

I did take time to brush off as much soil as I could and as we have not had a great deal of rain recently the soil was moist but not claggy. Bed 9 was decommissioned and covered for the winter months to prevent future weed growth. I need to plan what's going where next year before I start adding manure to the beds.  

The runner beans keep coming but I did notice a lot of snails on the plants, so I'm not expecting a whole lot more, the excess has been distributed to in laws and my eldest daughter.

There are two nice sized marketmore cucumbers on the vine and a number of small slow starters and I'm hoping they will be ready in a week or so when we run out of other allotment holders excess that I have been given as they know I was late getting stuff in because my wife was in hospital twice early in the growing season.

I love the way that when you do have an excess there are always family and friends and those include your plot neighbours who have not been growing that particular vegetable or have had a problem with that vegetable this year. 

Whilst digging up the spuds I noticed that something, mouse, rat or squirrel, yes all three are on and around the allotment had taken a fancy to my sweetcorn. It has not been a very good year for sweetcorn, I don't know what it is but fellow Allotmenteers on Mill Green and Spencer Road have notice that the plants appear shorter and the corns smaller than usual.

I looked what remained of the cob and they were ready for harvesting so I picked the lot. I do have another bed of corn but they have not even developed cobs and I'm doubtful I will get a crop from them. Look like I have been growing compost on that bed.

Wally has more marrows than he can deal with and offered me one of his excess marrows.

My plant died early on and I didn't get any planted this year. I have seed from the Wyevale 50p seed sale ready for next year, and if I do manage to get the half plot next door, these are the kind of things that can be allowed to grow and take over the areas I will not be able to weed and cultivate

A swift visit the Spencer Road plot on the way home resulted in me discovering that the self seeded pumpkins that were green and covered with foliage last visit have nearly turned colour and the vines have died right back.

Looks Like my daughters will not have to buy carving pumpkins this year for Halloween if they last that long their was a small one but it appears to have imploded and just melted away

The Burpless cucumbers are doing well, and I have the obligatory cucumber that has decided to grow through the mesh netting meaning it will have to be cut in order to harvest, I may get 3-4 cucumbers if the weather holds and we don't have an early frost.

I harvested the last of the spring onions and bagged up the last of the red and white onions off the growing rack and made my way home for lunch

After Sunday lunch I wash and trimmed the spring onions. Skinned and cut up the sweet corn and put in the freezer, the beans can wait until tomorrow.

I also had the excitement of trying the help the neighbour put out a fire that was consuming his boundary fence and hedging whilst we waited for the fire brigade to come and finish the job. Silly sod had decided to burn his hedge cuttings next too the fence and the wind took some burning embers and the fence went up as if it had been covered in petrol. 

Tuesday, 29 August 2017

Clearing a New Allotment


The question of how to clear a new allotment comes up on forums all the time and I normally chip in on the threads, but I thought it’s about time I produced a comprehensive answer and some personal guidance based on my experience that I can just put a link to it in the future so here it is!

Hurray I have an Allotment, now what do I do?

Normally if you have acquired a new plot the likelihood is that it’s going to be covered in crap and weeds up to four feet tall or if you are really unlucky eight feet of brambles that are hiding a six by eight foot shed at the back of the plot that you didn’t know was there! Yes true story that happened to a plot neighbour who took a plot on I had rejected because it looked like too much work.

The condition of the plot really depends how long it has not been used and if there has been an active waiting list or not. Go back five years 2012 and there were long waiting lists for most allotments due to all the grow it and cook it programs that were on the television. Recently 2017 however in some areas there are less people enthusiastic about taking on an overgrown monstrosity, however if it’s that bad ask you can always ask if you can have it rent free for the first year, I didn’t get my first allotment plot rent free for the first year, but I did the second plot. 
In 2020 due to the pandemic the waiting list have sored on my site we had a waiting list of 6 in March 2020 and by October it was 24. there are only 14 full plots most have been divided into half plots and there are five of us that still have full plots so there are only 23 plots, 2 are not in use because they have Japanese Knotweed. So the people on the waiting list have some time to wait because we only tend to loose 1 or 2 people per year.  

So where do you begin? First thing to remember is that Rome was not built in a day, and neither will your allotment be formed within in a few hours or a couple of days, it takes a lot of work and work takes time and effort.

Working on the plot little and often is the key and make sure that you enjoy the process and experience, don’t let it ever become a chore otherwise you will be one of those that give up within the first 3 months of ownership

First Day
Before you touch the plot, I suggest that you get the camera out and photograph the plot all around from locations you can go back to so that you can take regular photos of your progress and look back and see what progress you have made, because I guarantee you will get to a point where you “hit the wall” as runners say and you will feel like you aren’t making the progress you should be and may feel a little down and despondent, that’s the time to look at the photographs to remind yourself just how much you have actually done.

Plot 1A on Plan

Here was my first plot when I took it over in October 2012 


This was the view from the West Looking East

Take a walk around the plot and look in and see what you’re going to have to deal with if you can, you may be very surprised at what is actually lurking under all the weeds somethings may be useful others will just need to be bagged up and taken to the dump.

Health & Safety

It’s about now you should really be thinking about if your tetanus jabs are up to date, especially with bramble covered plots, as you will get scratched, pricked and cut doing this work no matter how careful you are.


Wearing gloves also keeps the grime out of your fingers because if you get an infection then fingers like to have a bit of a puss party and the solution is lancing and washing out, wrapping up and a couple of courses of anti-biotics. I managed to do this the same week I got my second allotment.

Getting Started

Put on a pair of sturdy gloves and clear an area in one corner of the plot and lay a plastic sheet or tarp down, then start retrieving the debris and sort it into two piles one of stuff that may be useful to keep and the other stuff to go to the dump.

You may be able to do this straight away if the plot is not too weedy or covered in brambles, but if the plot is really overgrown then you may have to start eating your way into the plot and build the piles as you expose the ground and discover what lies beneath.

I kept the terracotta pots in the photo above but all the glass and there was a lot of it some sheets buried under carpet was boxed up and taken to the dump.

If you’ve a lot of tall weeds, then it may be worth borrowing or hiring a petrol strimmer with a brush-cutter blade and taking them down to about 15cm above the ground, leave brambles a little longer – anything up to 60cm.

To clear the plot below I used a combination of normal shears and long handle shears, Secateurs, long handles Secateurs, and a hand scythe

Clearance Progress from October 2012 – January 2013

Clearing & Covering

Some books suggest composting weeds, but not all weeds are suitable for cold composting.

A lot of council run allotments will not allow fires between April and September, but if you are going to stack weeds to let them dry then stack them on pallets to keep them off the ground and allow air flow under the pile, and cover them to keep them dry, but take the covers off when you are working on the plot to allow the heap to breath and dry out more.

I burnt all the weeds using a couple if metal incinerators but if dry enough you could just have a bonfire, making sure there are no hedgehogs or slow worms in residence.

View from the South East corner looking North West Before & After

The carpet in the photo above was there already but has been covered with bindweed; most allotments will no longer allow the use of carpet to be used on allotments due to the risk of chemicals/glues leaching into the soil.

Now that you have been on the allotment for a while you will have looked at other plots and seen how they are managed, these loosely fall into two groups
  • Dig the whole thing over including paths every year
  • Formal structure with an infrastructure of beds and paths
I fall into the formal structure with beds and paths group, and my reasons are, I could not do with clearing the whole plot of weeds every year, battling nature on taking over a plot is quite enough for me thank you very much.

Mentally I can deal with the management of a 1.2m x 2.4m area of land and once cleared I can manure it. Breaking the plot up into areas helps me with crop rotation, I just move everything on four beds each year. I can grow green manure or just cover the beds over with a sheet of weed membrane to deny the weed seed light so they don't grow once they have finished for their year.  

By putting in paths in you effectively reduce the area that will need weeding if your paths are weed membrane, cardboard, covered with gravel, paving slabs or woodchips.

Make beds just wide enough 1.0 to 1.2m so they can be worked on from both sides without the need to stand on and compress and consolidate the soil so that digging in the future becomes easier. I adopt a no dig approach as much as possible, you still need to dig spuds but that means that the hard pan is dug in four beds each year as I rotate the crops.

Make the paths wide enough between the beds so that you can get the bottoms of your legs (knee to foot) in comfort for planting and hand weeding, I originally planned for 450mm wide but rethought and made them 600mm wide which for me is just enough. 
 

Once the weeds are cleared it’s a good idea to cover the ground so that the weeds die off. You can do this with cardboard and tarps, just tarps, or damp proof membrane, or weed membrane. The objective is to cut off light to the weeds so they die and you are not fighting on all fronts to keep the weeds at bay.


You will soon learn that if there is a drop of rain in the summer and you come back after two weeks you will have a lot of weeding to do in your growing beds.

Damp-Proof Membrane 1200ga Black 4m x 25m (47163) from Screwfix is around £60
Recently I managed to purchase 2m x 50m of Heavy Duty weed membrane off ebay for £24.99 a roll and 5% if you bought a second roll.

The key to making headway on a plot is to not to try and get it all done at once, give yourself a small goal and then you feel a sense of achievement when you've reached it, then set the next goal etc.  Also when you are digging start from a corner and work your way back and get in your infrastructure and beds, it may sound silly but work so that when you look up you see what you have done not what’s still to be done.


Before you know it (six to seven months in from getting the plot) the first six beds and the paths around them are in and you have planted your first crops. In my case I went for potatoes in the first four beds, one bed of earlies. One of seconds and two of main crop potatoes, as the timing was right and they are great at helping in breaking up the soil, and you have to dig those beds again in the same year to harvest them. The other two beds were cabbages and sprouts.

You may recall that the North East end of the plot had been covered in carpet and had been overgrown with weeds.  When the carpet was removed the clay was shiny and looked polished and was set like concrete. It could not be dug with a fork; in fact I broke a fork and had to buy a better and stronger one. I had to take a pickaxe to it in the first instance just to break it up so that I could dig it.

Do Not Rotavate

Whatever you do Do Not Rotavate, yes you can hire a machine and cut all the roots of the existing couch grass into two to three inch lengths, but each one of those cut roots is going to want to continue to live and grow and within a month the whole plot is coved with more weeds than you started with.

With a bramble patch, it’s tough work digging out the roots. Leaving some cane above ground level enough to give you something to pull at!

I don’t recommend digging the plot over in the first instance with a spade or mattock, especially if you have couch grass and brambles. Its best to dig using a fork if possible and easing the couch grass up through the ground like an alien beast being exposed and easing the tentacles that extend in all directions, lifting and vibrating the earth on the fork so that the roots loosen their grip and what’s on top of the fork gets easier to handle, and starts coming to the surface faster, until the mat of weeds that resembles an alien is there for you to lift and you can hold it high in the air like a conquered alien.

OK it all sounds a bit dramatic but that the feeling you experience, when you finally ease a large network of couch grass, or bramble roots out of the ground.

Remember the objective is to remove all the couch grass and brambles that you find whilst digging, there is going to be some you have missed and it will come back but when it does dig around it expose the root system and extract as much as you can.

Digging The Paths

There are books that suggest that you don’t have to dig the paths and that it’s a waste of effort. I can’t agree with that as how can you expect to keep beds weed free when there are weeds in the paths that surround them?  Paths deserve to be cleared the same as the beds to help give you a fighting chance at keeping the weeds under control.

What Kind Of Paths To Use?

The options are down to personal taste and may also depend on what you can lay your hands on and are Soil, Cardboard Grass, Weed Membrane, Timber, Woodchip, Paving Slabs, Pea Shingle.

Bed Edging

The material and form of bed edging is down to personal choice and dependent upon how much you want to spend and what materials you have on hand. You may decide that you want grass paths with an edge and dug bed with no difference in level or you may want to define and maintain an edge, all well and good if you have a way of cutting the grass.

I knew that I wanted to use woodchip for the paths but I needed an edging, so initially I bought some plastic lawn edging and the path and beds were level. I used a portable hoop frame that I had made to use as a jig when using a spade to form the slot to push the edging into. Surrounded the bed with weed membrane and covered in wood chip

I recall a great sense of achievement when the first bed was completed, which spurred me on to get the following ones installed. The plastic lawn edging lasted about two years before it became brittle and I found other materials to take its place.


The industrial estate behind the allotment was being sold off and a window replacement company had loads of plastic trim they were going to skip so I saved it and used it to replace the green corrugated lawn edging.


Next I acquired some timber joist from a demolition job and started replacing the plastic with timber which helps keep the soil in the bed and you can add compost and raise the level slightly.

In the photo above I also acquired some paving slabs which I used on the central main path down the plot. Freecycle is a great resource for all manner of materials and items that are useful on an allotment i.e. Sheds, Greenhouses, You normally have to dismantle and take away,. Compost Bins (Daleks), Water Butts, Blow Away Growhouses, Seed Trays, Module liners, pots and containers, Fruit bushes etc.


On my second plot I went straight in for decking to define the beds and it also allows for me to gradually improve the soil and add compost to the beds. The path in the bottom right corner is for disabled access to my neighbours plot. The slabs for the area next to the shed and the path down the middle were all obtained off freecycle. Weed membrane is cut with a soldering iron to stop it fraying (See Here) and used under the slabs and to keep the weeds down.


I have seen roof tiles come up on Freecycle in the past but had never thought of them for creating bed edging.

The photo on the left is from a thread called Scrapheap Challenge written by Snadger which is a diary or journal about his scrapheap plot that he took over and is developing which I enjoy following on the Grow Your Own forum Grapevine.

I  trust that this article give you enough to get going with your new plot, I will try to expand upon it and flesh it out a little more but for the mean time you can read my dairy from 2012 and work your way through my changing plans and development of my allotment and hopefully learn from some of my mistakes.