

The
question of how to clear a new allotment comes up on forums all the time and I
normally chip in on the threads, but I thought it’s about time I produced a
comprehensive answer and some personal guidance based on my experience that I can just put a link to
it in the future so here it is!
Hurray I have an Allotment, now what do I do?
Normally if you have acquired a new plot the likelihood is that it’s going to be covered in crap and weeds up to four feet tall or if you are really unlucky eight feet of brambles that are hiding a six by eight foot shed at the back of the plot that you didn’t know was there! Yes true story that happened to a plot neighbour who took a plot on I had rejected because it looked like too much work.
The condition of the plot really depends how long it has not been used and if there has been an active waiting list or not. Go back five years 2012 and there were long waiting lists for most allotments due to all the grow it and cook it programs that were on the television. Recently 2017 however in some areas there are less people enthusiastic about taking on an overgrown monstrosity, however if it’s that bad ask you can always ask if you can have it rent free for the first year, I didn’t get my first allotment plot rent free for the first year, but I did the second plot.
In 2020 due to the pandemic the waiting list have sored on my site we had a waiting list of 6 in March 2020 and by October it was 24. there are only 14 full plots most have been divided into half plots and there are five of us that still have full plots so there are only 23 plots, 2 are not in use because they have Japanese Knotweed. So the people on the waiting list have some time to wait because we only tend to loose 1 or 2 people per year.
So where do you begin? First thing to remember is that Rome was not built in a day, and neither will your allotment be formed within in a few hours or a couple of days, it takes a lot of work and work takes time and effort.
Working on the plot little and often is the key and make sure that you enjoy the process and experience, don’t let it ever become a chore otherwise you will be one of those that give up within the first 3 months of ownership
First Day

Before you
touch the plot, I suggest that you get the camera out and photograph the plot
all around from locations you can go back to so that you can take regular
photos of your progress and look back and see what progress you have made,
because I guarantee you will get to a point where you “hit the wall” as runners
say and you will feel like you aren’t making the progress you should be and may
feel a little down and despondent, that’s the time to look at the photographs
to remind yourself just how much you have actually done.
Plot 1A on
PlanHere was my first plot when I took it over in October 2012

This was
the view from the West Looking East
Take a walk around the plot and look
in and see what you’re going to have to deal with if you can, you may be very
surprised at what is actually lurking under all the weeds somethings may be
useful others will just need to be bagged up and taken to the dump.
Health & Safety

It’s about now you should really
be thinking about if your tetanus jabs are up to date, especially with bramble
covered plots, as you will get scratched, pricked and cut doing this work no
matter how careful you are.

Wearing gloves also keeps the grime out of your fingers because if you get an infection then fingers like to have a bit of a puss party and the solution is lancing and washing out, wrapping up and a couple of courses of anti-biotics. I managed to do this the same week I got my second allotment.
Getting Started
Put on a pair of sturdy gloves and clear an area in one corner of the plot and lay a plastic sheet or tarp down, then start retrieving the debris and sort it into two piles one of stuff that may be useful to keep and the other stuff to go to the dump.
You may be able to do this straight away if the plot is not too weedy or covered in brambles, but if the plot is really overgrown then you may have to start eating your way into the plot and build the piles as you expose the ground and discover what lies beneath.
I kept the terracotta pots in the photo above but all the glass and there was a lot of it some sheets buried under carpet was boxed up and taken to the dump.
If you’ve a lot of tall weeds, then it may be worth borrowing or hiring a petrol strimmer with a brush-cutter blade and taking them down to about 15cm above the ground, leave brambles a little longer – anything up to 60cm.
To clear the plot below I used a combination of normal shears and long handle shears, Secateurs, long handles Secateurs, and a hand scythe

Clearance Progress from October 2012 – January 2013
Clearing & Covering
Some books suggest composting
weeds, but not all weeds are suitable for cold composting.
A lot of council run allotments
will not allow fires between April and September, but if you are going to stack
weeds to let them dry then stack them on pallets to keep them off the ground
and allow air flow under the pile, and cover them to keep them dry, but take
the covers off when you are working on the plot to allow the heap to breath and
dry out more.
I burnt all the weeds using a
couple if metal incinerators but if dry enough you could just have a bonfire,
making sure there are no hedgehogs or slow worms in residence.

View from
the South East corner looking North West Before & After
The carpet in the photo above was
there already but has been covered with bindweed; most allotments will no
longer allow the use of carpet to be used on allotments due to the risk of
chemicals/glues leaching into the soil.
Now that you have been on the
allotment for a while you will have looked at other plots and seen how they are
managed, these loosely fall into two groups
- Dig the whole thing over including paths every year
- Formal structure with an infrastructure of beds and paths
I fall into the formal structure with beds and paths
group, and my reasons are, I could not do with clearing the whole plot of weeds
every year, battling nature on taking over a plot is quite enough for me thank
you very much.
Mentally I can deal with the management of a 1.2m x 2.4m area of land and once cleared I can manure it. Breaking the plot up into areas helps me with crop rotation, I just move everything on four beds each year. I can grow green manure or just cover the beds over with a sheet of weed membrane to deny the weed seed light so they don't grow once they have finished for their year.
Mentally I can deal with the management of a 1.2m x 2.4m area of land and once cleared I can manure it. Breaking the plot up into areas helps me with crop rotation, I just move everything on four beds each year. I can grow green manure or just cover the beds over with a sheet of weed membrane to deny the weed seed light so they don't grow once they have finished for their year.
By putting in paths in you effectively
reduce the area that will need weeding if your paths are weed membrane,
cardboard, covered with gravel, paving slabs or woodchips.
Make beds just wide enough 1.0 to
1.2m so they can be worked on from both sides without the need to stand on and
compress and consolidate the soil so that digging in the future becomes
easier. I adopt a no dig approach as much as possible, you still need to dig spuds but that means that the hard pan is dug in four beds each year as I rotate the crops.
Make the paths wide enough
between the beds so that you can get the bottoms of your legs (knee to foot) in
comfort for planting and hand weeding, I originally planned for 450mm wide but
rethought and made them 600mm wide which for me is just enough.


You will soon learn that if there is a drop of rain in the summer and you come back after two weeks you will have a lot of weeding to do in your growing beds.
Damp-Proof Membrane 1200ga Black 4m x 25m (47163) from Screwfix is around £60
Recently I managed to purchase 2m x 50m of Heavy Duty weed membrane off ebay for £24.99 a roll and 5% if you bought a second roll.
The key to making headway on a plot is to not to try and get it all done at once, give yourself a small goal and then you feel a sense of achievement when you've reached it, then set the next goal etc. Also when you are digging start from a corner and work your way back and get in your infrastructure and beds, it may sound silly but work so that when you look up you see what you have done not what’s still to be done.

Before you know it (six to seven
months in from getting the plot) the first six beds and the paths around them
are in and you have planted your first crops. In my case I went for potatoes in
the first four beds, one bed of earlies. One of seconds and two of main crop
potatoes, as the timing was right and they are great at helping in breaking up
the soil, and you have to dig those beds again in the same year to harvest
them. The other two beds were cabbages and sprouts.
You may recall that the North
East end of the plot had been covered in carpet and had been overgrown with
weeds. When the carpet was removed the
clay was shiny and looked polished and was set like concrete. It could not be
dug with a fork; in fact I broke a fork and had to buy a better and stronger
one. I had to take a pickaxe to it in the first instance just to break it up so
that I could dig it.
Do Not Rotavate
Whatever you do Do Not Rotavate,
yes you can hire a machine and cut all the roots of the existing couch grass
into two to three inch lengths, but each one of those cut roots is going to
want to continue to live and grow and within a month the whole plot is coved
with more weeds than you started with.
With a bramble patch, it’s tough work digging out the roots. Leaving
some cane above ground level enough to give you something to pull at!
I don’t recommend digging the plot over in the first instance with a
spade or mattock, especially if you have couch grass and brambles. Its best to
dig using a fork if possible and easing the couch grass up through the ground
like an alien beast being exposed and easing the tentacles that extend in all
directions, lifting and vibrating the earth on the fork so that the roots
loosen their grip and what’s on top of the fork gets easier to handle, and
starts coming to the surface faster, until the mat of weeds that resembles an
alien is there for you to lift and you can hold it high in the air like a
conquered alien.
OK it all sounds a bit dramatic
but that the feeling you experience, when you finally ease a large network of
couch grass, or bramble roots out of the ground.
Remember the objective is to
remove all the couch grass and brambles that you find whilst digging, there is
going to be some you have missed and it will come back but when it does dig
around it expose the root system and extract as much as you can.
Digging The Paths
There are books that suggest that you don’t have to dig the paths and
that it’s a waste of effort. I can’t agree with that as how can you expect to
keep beds weed free when there are weeds in the paths that surround them? Paths deserve to be cleared the same as the
beds to help give you a fighting chance at keeping the weeds under control.
What Kind Of
Paths To Use?
The options are down to personal taste and may also depend on what you
can lay your hands on and are Soil, Cardboard Grass, Weed Membrane, Timber,
Woodchip, Paving Slabs, Pea Shingle.
Bed Edging
The material and form of bed edging is down to personal choice and
dependent upon how much you want to spend and what materials you have on hand.
You may decide that you want grass paths with an edge and dug bed with no
difference in level or you may want to define and maintain an edge, all well
and good if you have a way of cutting the grass.

I knew that I wanted to use woodchip for the paths but I needed an edging, so initially I bought some plastic lawn edging and the path and beds were
level. I used a portable hoop frame that I had made to use as a jig when using
a spade to form the slot to push the edging into. Surrounded the bed with weed
membrane and covered in wood chip
I recall a great sense of achievement when the first bed was completed, which spurred me on to get the following ones installed. The plastic lawn edging lasted about two years before it became brittle and I found other materials to take its place.
I recall a great sense of achievement when the first bed was completed, which spurred me on to get the following ones installed. The plastic lawn edging lasted about two years before it became brittle and I found other materials to take its place.

The industrial estate behind the allotment was being sold off and a window replacement company had loads of plastic trim they were going to skip so I saved it and used it to replace the green corrugated lawn edging.

Next I acquired some timber joist from a demolition job and started
replacing the plastic with timber which helps keep the soil in the bed and you
can add compost and raise the level slightly.
In the photo above I also acquired some paving slabs which I used on the
central main path down the plot. Freecycle is a great resource for all manner
of materials and items that are useful on an allotment i.e. Sheds, Greenhouses,
You normally have to dismantle and take away,. Compost Bins (Daleks), Water
Butts, Blow Away Growhouses, Seed Trays, Module liners, pots and containers,
Fruit bushes etc.
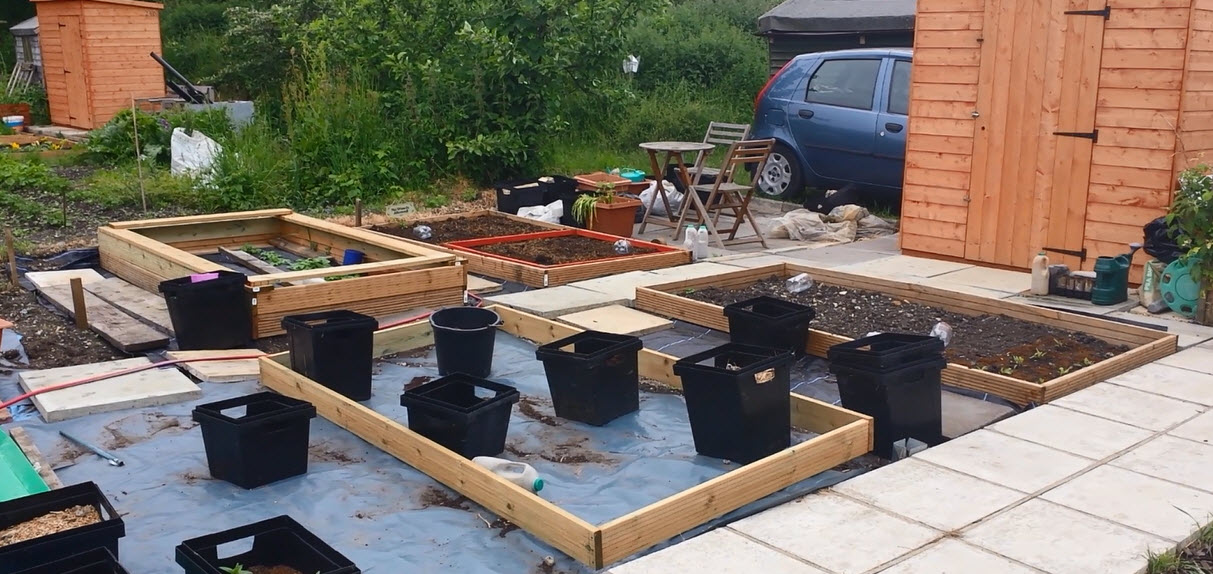
On my second plot I went straight in for decking to define the beds and it also allows for me to gradually improve the soil and add compost to the beds. The path in the bottom right corner is for disabled access to my neighbours plot. The slabs for the area next to the shed and the path down the middle were all obtained off freecycle. Weed membrane is cut with a soldering iron to stop it fraying (See Here) and used under the slabs and to keep the weeds down.

The photo on the left is from a thread called Scrapheap Challenge written by Snadger which is a diary or journal about his scrapheap plot that he took over and is developing which I enjoy following on the Grow Your Own forum Grapevine.
I trust that this article give you enough to get going with your new plot, I will try to expand upon it and flesh it out a little more but for the mean time you can read my dairy from 2012 and work your way through my changing plans and development of my allotment and hopefully learn from some of my mistakes.
Excellent advice for new plot holders. I will add a link to it on our Facebook page.
ReplyDeleteHi Betty thank you for your kindness, I'm very happy you have found it useful and worthy of a link
Delete