Friday 31 July 2020

Weed Identification


weed is a plant considered undesirable in a particular situation, "a plant in the wrong place". Examples commonly are plants unwanted in human-controlled settings, such as farm fieldsallotments gardenslawns, and parks.

The term "weed" has no botanical significance, because a plant that is a weed in one context is not a weed when growing in a situation where it is in fact wanted, and where one species of plant is a valuable crop plant, another species in the same genus might be a serious weed, such as a wild bramble growing among cultivated loganberries.

In the same way, volunteer crops (plants) are regarded as weeds in a subsequent crop.

Many plants that people widely regard as weeds also are intentionally grown in gardens and other cultivated settings, in which case they are sometimes called beneficial weeds or wildflowers

The term weed also is applied to any plant that grows or reproduces aggressively, or is invasive outside its native habitat.

Not being able to get to my allotment for four months during the first Corona Virus wave, my plots are covered with weeds, and it occurred to me that I could not identify many of them and wanted too and to find out the best ways of dealing with them and should they be Burnt, taken from the plot, safe to compost directly of did they need to be dried or drowned before adding to the Dalek Army? 


The intention was to make a post using a table with a small photo and the plants name, what it's also know as, a few facts and then a link the the RHS or other source of more information.

The problem is that Google now own Blogger and are re-engineering also know as "fucking up" the editing software that was already naff. Tables were in the beta that we have been using before the forced move over to the new platform, but suddenly it's gone! 

So until it returns and hopefully in a functional way and without having to program in HTML my solution has been to upload all the photos to my Facebook and put the information and links there. 

I have shared this with all the gardening and allotment groups I belong too so that people can access until Google sort out the Blogger editor and I can do it directly on here. 

Information Sourced from a number of pages via a google search for "weed identification UK" and books I have, a few listed below. 

DK Allotment Handbook Pages 239-239 Gallery of Weeds


Thursday 30 July 2020

Mentioned in Dispatches by Thompson & Morgan

Thompson & Morgan


Hi Alan,

July is the glorious month when our beds, borders, baskets and containers are at their peak - and if you’re a veg grower, it’s the season of gluts! This month we’ve loved seeing your homegrown harvests, reading your allotment news and admiring your beautiful blooms. Here are just some of the stories that particularly caught our eye…

Drop us a line via blog@thompson-morgan.com if you spot something that deserves a mention in our August email. And please make a fellow blogger’s day by sharing these posts...


Pretty in pink

David had that ‘I’ve got to have it’ feeling when he saw Diascia personata last summer. See why it’s his ‘plant of the year’ over at David's Garden Diary.

Read more »

Bonsai magic

Bonsai is the ancient Japanese craft where gardening meets art. Visit T&M's blog for expert tips, and try this stress-relieving hobby at home.

Read more »

Rambling roses

If you’re a sucker for a rose-covered cottage, you’ll love Susan Rushton's beautiful images. Discover 18 stunning ways to support a rambling rose.

Read more »

Allotment update

Check out this allotment masterclass over at The Frustrated Gardener! Dan’s only had this plot since January but his stunning veg will make your mouth water.

Read more »

Stylish meadow

Think meadows are messy? Pauline’s neat patches of flowery meadow at Lead Up The Garden Path gracefully attract birds and insects galore.

Read more »

Hydroponics

At manVslug.uk Alan’s been dipping his toe into hydroponics. See his ingenious idea for recycling plastic tubs into soil-free growing systems.

Read more »

Wild strawberry cake

Overrun with wild strawberries? Make the most of those tiny fruits and satisfy your appetite with this delicious recipe shared by Shaheen at Allotment2Kitchen.

Read more »

Mulling on Mullein

When this statuesque wildflower turned up at Mal's Edinburgh Allotment, he was delighted. But who knew it can be used to stupify fish or line your shoes?

Read more »


All the very best,

Thompson & Morgan blog team


Twitter   Facebook   Pinterest   Instagram  

You're receiving this email as you're one of our favourite bloggers.


Wednesday 29 July 2020

Re-Purpose Rubbish II


Re purposing plastic takeaway containers, using a craft / Stanley knife cut two slots either end of the container lid. Take one sheet of kitchen roll and fold in half then trim to width and pull each end into the slot so that the towel will end up on the top after you fill the container with water and pop the lid on.
The water will wick up the towel and will keep your seeds damp so that they can germinate. Do and leave it, no keep going back to spray and water. I'm going to try this method with micro greens so I can trim easily.
The bottom tray in the background of the top photo was placed on top as a propagator lid.

Sunday 26 July 2020

Weeding & Composting


Not the usual view of the allotment as I don't often include the building behind because for at least the last four years it has been a building site. My plot neighbour who has taken the areal views for me lives in the top floor flat behind my shed and greenhouse on plot 1 (the left side).

    
This photo is looking just at plot 1 and the Dalek army along the path between plots 1 & 2 and the most of today was spent cutting back and up the comfrey bed and the grapevine and filling to the brim the Dalek on the right by the path into plot 1A. 


I was going to remove the grapevines last year and only actually got around to removing two of the 3 plants. The result was that the remaining vine has gone mad and into catch up mode and has taken over the wall behind the greenhouse on Plot 1A, but the bindweed has also stated to cover it as well as the leaf bins. 


Once I had filled the Dalek I started clearing the Bindweed from Dalek No 1 that needs relocating with the others and pulling the bindweed off the two leaf bins. More time and effort is required to clear all this bind weed away from along the wall and on this side of the plot, but I'm happy with what I managed to get done today in a couple of hours, Rome was not  built in a day.   


Photo on the left is the 17th July and that on the right is the 26th July just 9 days in the ground and a little rain and the difference is size and growth can be seen. 

What's also noticeable is the amount of weeds coming through the additional holes. I didn't get around to removing these  weeds during this visit and that means they will need to be dealt with on my next visit when they will be at least twice as big. 

What this is telling me is that I need to make some squash specific planting membrane sheets up that only have the two holes for the two squash plants each end in each corner and a watering hole in between them for a pop bottle with pin holes so that I can water at depth between them.

As my available time to get to the allotment is reducing as my wife needs additional care I need to find as many ways as possible to reduce the need for weeding and become more efficient. This is another reason I'm looking into hydroponics and in particular the Kratky Method as what I could do this with less frequent watering visits during the summer growing season.


Weeds, Weeds Everywhere! 

Because of covid-19 and four months of relative neglect of the plot there are weeds everywhere that need to be dealt with. On plot 1 I have Marestail also known as Horsetail or that bastard stuff that has been around since prehistoric times. You can't really dig out or chemically treat it, you just have to keep pulling it up and keeping on top of it and hopefully over time it will reduce in strength and dissipate a little. 

What I didn't know is what a lot of the other weeds that are growing are called and more importantly it occurred to me that I don't know which ones can be safely composted and which ones (apart from Marestail you should just burn).  

Thus having photographed these weeds I have set myself the task of identifying them, with the aid of fellow allotmenteers on Facebook Groups of course and producing a reference guide of some description. 

Quick footnote, Rain most of yesterday and over night, yes it was wet, yes I should have worn boots and not trainers that got wet in the toes, but it was fantastic just to get away from the house and the same four walls for a few hours. I saw and talked to people other than my wife including my sister-in-law who hopefully we can socialise with again once we stop shielding next month.  

Saturday 25 July 2020

Hydroponic Nutrients Desk Study

As I mentioned in my last post on hydroponics having now made up five Mini Kratky Systems and having two plant feeds ant my disposal already I started looking a little deeper into what other nutrient systems are out there for the beginner to play with. Here are some very informative YouTube Videos that I've found and have placed on the blog so that...

A) I can find them really easily next time I want to watch them and

B) Hopefully if you are also starting out with hydroponics they are going to help you 


Friday 24 July 2020

Mini Kratky Method Hydroponic System II


I was busy tonight.  I now have 5 units which have cost me a little time and the cost of the 20 Net cups which was £6.72 including the Free Delivery from eBay. See previous post on how these are made. 

I'm going to experiment a bit and I'm going to start with Radish, on the basis that if its good enough for NASA it's good enough for me.  I have some Nutrigrow Plant Feed from Greenhouse Sensations that I got with the Quadgrow and some envii SeaFeed Xtra already but there are other products and mixes that you can buy and make up to feed your plants and I will try them as well as see what gives the best results. 

I'm also going to steep (drain water through the compost and collect the other side so it takes the nutrients with it) some compost bought and my own to see how that goes. I was tempted to try comfrey but I'm aware that there is research that suggests that it can be carcinogenic (having the potential to cause cancer) and thought it's not perhaps such a good idea to feed it directly hydroponically to vegetables.

If there are any Hydroponic companies/ suppliers out there that want to send me your wonder feed to trial please feel free the more varieties of feed I can get my hands on the better. 

For more information on Hydroponics check out Wikipedia Hydroponics it covers all the buzz words and is a great source of information.  

Thursday 23 July 2020

Mini Kratky Method Hydroponic System


Take one empty washing machine detergent capsules plastic container, and peel off the labels. Mark the top and carefully cut out four holes that will allow No 1 hydroponics mesh cups to be inserted and there you have it. A mini passive hydroponics or Kratky method hydroponic system to play with.


There is nothing like repurposing plastic containers before ultimately recycling them.


Wednesday 22 July 2020

Re-Purpose Rubbish

Wife says to me "Why haven't you put the polystyrene from the new furniture in the rubbish?"
"I have a use for it on the allotment in my new greenhouse!", said I
"I should have known It had to be something to do with that Bloody Allotment" she replied
And so I bought a pack of No 2 Black Hydroponic / Aeroponic Mesh Pots and now I have cut the polystyrene to fit and the holes for the Mesh Pots and I know how many I'm ultimately going to need I have bought some more and they are on their way.
I see some late Winter Lettice in the new greenhouse being a possibility this year.

Anyone else having a bash at this?

Also on its way to make the magic happen ......


Solar Powered Oxygenator Water Oxygen Pump Air Pump Aerator Pond Fish Tank UK 

Description:

Item type: Oxygen Pump

Usage: 1. Long press the power switch (press for 3 seconds) blue light, which began to play oxygen, this time for the long-term oxygen mode, 2. Press the power switch (press 1 times) Oxygen mode is switched to intermittent Mode, (stop for 2 seconds, oxygen cycle mode for 8 seconds), 3. charge

Battery: 3.7V/3600 mA

Oxygenation mode: long-term oxygenation, intermittent oxygenation

Product size: 100*80*38mm

Charging input: DC 5V / 1A

Weight: 560 grams

Battery capacity: 3.7V/3600mA/h

Gas volume: 2L/min

Specifications: sky blue

Pressure: 0.15mpa

Working hours: full of 24H or more

Package includes:

1 * Oxygen Pump

1 * Solar Panel

1 * Check valve

1 * Air Stone

1 * Charging Cable

1 * Screws

4 * Footpad

1 * Hanging buckle

As the pump comes with a globe air stone I have also purchased a 400mm or 16 inch long air stone to better oxygenate the large gravel tray 

Tuesday 21 July 2020

Quadgrow Unboxing


So here is a series of photos I took when unboxing the Greenhouse Sensations Quadgrow & the Water Butt Extension Kit. I've included the drawing above so that you can identify the names of the parts that make up a Quadgrow  


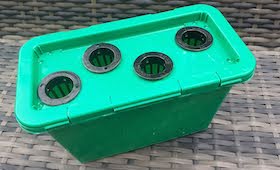
View into the box on opening 


I emptied the box and laid out the parts on the garden bench 


The Capacity of the Quadgrow is 30 Litres which is 15 Litres per Smart Reservoir,

I originally thought that the marks on the inside of the Smart Reservoir below the weep hole were some form of measurement perhaps for the dipstick but I asked Greenhouse Sensations and it appears "they are marks left from the injection moulding tool when they are ejected".
As I stated in my first posting about the Quadgrow it could really do with a water level indicator rather than the timber dipstick 


On the outside there is a line just below the overflow hole and the word Max, unfortunately when I set my units up the overflow was facing the wall. When I set up in the greenhouse I will make sure I have the overflow facing the front where I can see it.   


The 21mm diameter hole in the middle of long face of the Smart Reservoir is for the optional Water Butt Kit if you are not using one these holes can be sealed using the two black grommets supplied. 
   

What I liked straight away was the quality of the Pots and the decorative feature pattern around the top. 


Having seen the Quadgrow at the Gardening Press Event I knew what most of the parts were in the zippy bag with the exception of the long timber sugar spoon, which on inspection of the Schedule of contents on the front page of the instructions turned out to be a Dipstick 
At the time of receiving the Quadgrow the intention was to connect the two Smart Reservoirs together with the Tank Connector the washers and the Root Filters using the Spanner provided in the kit, however It transpired because of Covid-19 that I would end up using the two halves separately so that I could move them around a little as I had some work to do on the rear patio door.  


To enable this separation two 25mm rubber grommets were required. These unfortunately are not supplied like the two 21mm ones are for the Water Butt holes are. I purchased a pack of six 25mm rubber grommets for £2.36 including postage and packaging from eBay. 


I set up the two units with the Tank Connector to take this photo and they were transferred into a portable greenhouse until we had high winds and the greenhouse wanted to become a kite.

This I ended up setting them up independently and decided that getting the Mulch Cap and Cane Support Kits and the Protective Lids or Propagators would be a good idea so these came in a separate package   


Don't do what I did and try and put the cane grommet in the Feeder Tray one set go in the Mulch Caps and the other in the recess in the Smart Reservoir  


This was the first half I set up and put the canes in place.


I only had time to fill and plant one tomato in the second half of the Quadgrow. 

I was running out of daylight as I got to the forth pot, and was not sure which plant to pot on, so I topped the pot up to the brim and the underside of the mulching cap with compost. I used an empty flower pot the same size as the one the tomatoes were being transplanted from to make/ form a hole the right shape and depth in the larger Quadgrow pot for potting up the following day.


Here is an example of what I'm trying to explain above in the Elho Self Watering Pot 


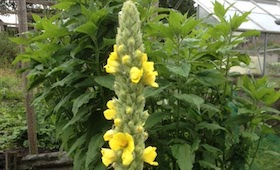
Nice healthy tomato plants in the Quadgrow  

If you are reading this post on a Windows 10 Computer if you click on an image you should get all the images full screen to look at. 

The Small Print. I have not been paid to write this review, I'm not on commission, trial equipment was provided to me in order to review.